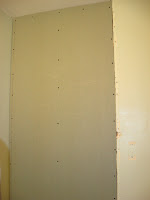


After doing some investigating (mainly cutting holes in the drywall and floor), we discovered that all of the original plumbing was still there- just capped off. So, our next step was to close off the wall between the hall and master bathrooms. We started by framing out our new wall. This was my first wall, and first time with the big nail gun- I was very pleased with myself.

 Then, we installed the drywall. Well, not actually drywall, but green-board, which is more water resistant than regular drywall, and will help to reduce the chances of ever having an issue with mold in the bathroom.
 Then, we began the "mudding" process. Basically, you have to tape up all of the edges of the new drywall and slap a layer of joint compound over the seams. When it's dry, you sand it and do it all over again. When you think it's good- you "hit it again" as our friend Ryan used to say to his wife Heather when they were remodeling their home. You can also use it to change the texture of your wall (which we did as well). What we didn't think about was the humidity in Oregon. In Phoenix, this stuff would have practically dried before we got it on the wall. Here, in 85% humidity, it took an entire weekend- with Tim's 500 watt halogen lamp plugged in to create heat and the fans running.
After we finally got the mud dry and smooth, we were able to prime & paint! To go with our new smooth texture on the walls, we wanted a matte finish paint. However, you want your walls to be washable in the bathroom- so we decided to go with a flat exterior paint, which is washable. We also put a layer of Kilz primer on the subfloor- an extra layer of protection against that pesky mold. Finally, we were ready to lay the flooring. We decided to go with a vinyl peel & stick tile- it's water resistant, easy to install, and was also one of our attempts at keeping the budget in line. The most important part to remember when you're laying vinyl tile is to be sure you have a good control line before starting. Also, we decided to vary the placement of the tiles so that lines would not match up- it helped in achieving a more cohesive look.

Once we were done with the flooring, Tim was able to install the new toilet. This was relatively easy since all of the plumbing lines were already in place.

We also installed a new light fixture above the sink (no more ugly brass!). After we had it set up, we realized that it did not put out quite enough light. So, it was a quick install of two new 3" can lights in the ceiling. We should also note that we installed a new exhaust fan. Compared to the old one, which drowned out all surrounding sound in the house, this one is amazing. When the shower is running, you can't even hear the fan. Not to mention the air circulation- 90 cubic ft./minute- when it is on with the door closed, you can feel it pulling air in from the hallway. It will exhaust all of the air in the bathroom in 3 1/2 minutes. That's some serious circulation. No more steamy mirrors in this house!
 Along with the new light fixture, we also put in a new mirror. I was concerned about finding affordable mirrors for this house (especially since we needed 3- one for each bathroom and one for my soon-to-be vanity area in the master). Amazingly, we were able to find 3 pretty cute options at Ross of all places. The one we installed in the hall bath was only $19.99!
 At this point, there are only a few minor details to go- changing out the drain in the tub (the current one is a little rusty), adding a few more pieces of trim, caulking the tub and trim and a little touch up paint. Compared to the state of the rest of the house- this room is like paradise!
No comments:
Post a Comment