Sunday, July 17, 2011

Our first step toward being guest friendly


After we finished the master, we moved on to the Office/Guest Room. Luckily, there was very little electrical work to do here (other than replacing the outlets & switches), and only a few drywall patches. So, with very little mud, we were able to move straight to paint and flooring! After Tim convincing me on some pretty neutral colors in most of the house, I was able to talk him into a beautiful dark charcoal grey for this room. Also, because there were not as many cuts, we were able to finish the flooring in this room in about 2 hours.
We also concocted our own lighting solution for this room. We had a lamp that did not make it through the move, so we decided to use the lampshade and a $5 lighting disc from Home Depot to create a fixture. It was pretty easy, and obviously very economical. Of course, it's pretty hard to see in photos. So, just trust us.. it looks pretty good. :)
Of course, we still have to decorate and someday decide on a solution for the computer desk that does not involve using our camping tables- but for now, we're calling it good and moving on.

We finally have a real bedroom!

It's been some time since we've added any updates to the blog- mainly because we started out thinking we would post as each individual project was completed. We are now coming to a point where there are some rooms and areas that are partially completed- but it may be a while before we are comfortable calling them "done". So, with that being said, we wanted to give an update on some of the things we have been working on over the last few weeks.

We'll start with the master bedroom. When we moved in, the door to the master was located at the end of the hallway. The awkward footprint this created gave the room little usable space, and had we left it alone, we would have had the bed pushed into a corner. We quickly realized that by moving the door to the room, we would be able to gain some square footage. Knowing we would be creating a mess in that room, we initially set up our temporary bedroom in the small back bedroom of the house.

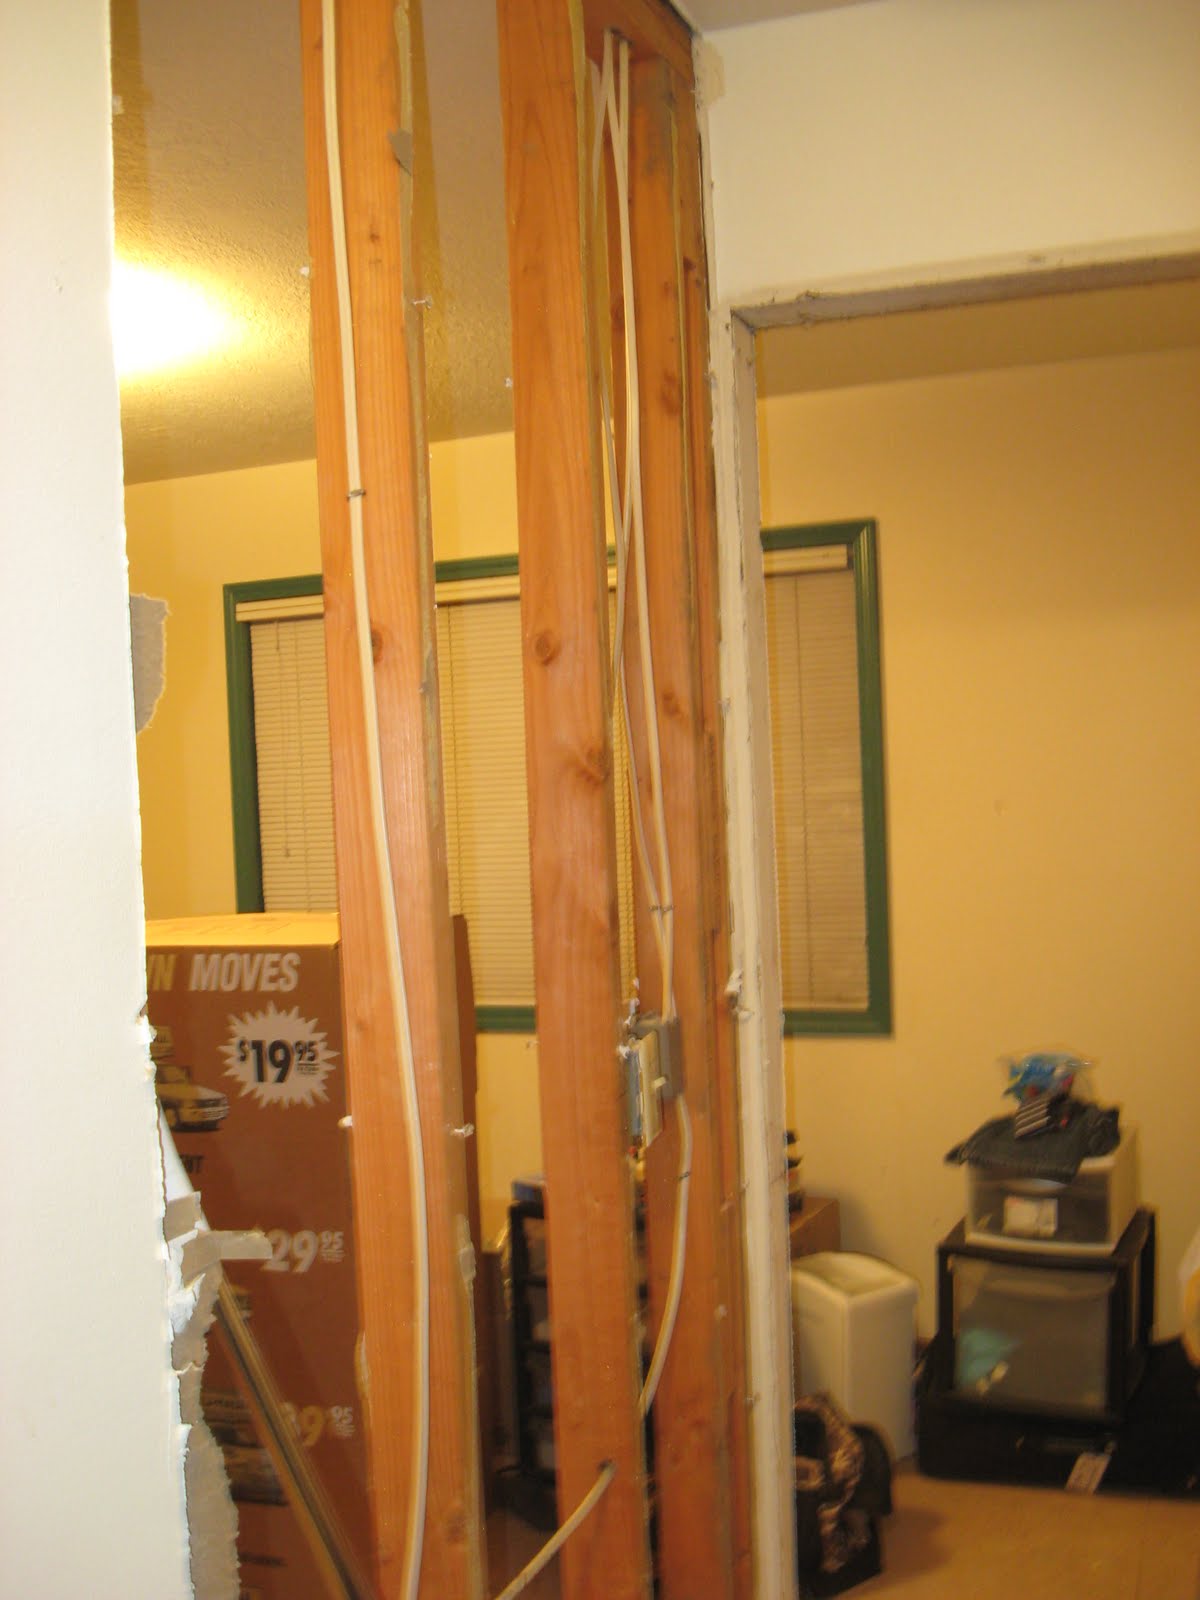
The first step in re-claiming our master was to remove the existing door and tear down the drywall between the bedroom and the hallway. For perspective, the view below is taken from the hallway, looking into the existing doorway and through the wall.
We also had to (of course) do some electrical work in the room. The bonus was that we could add boxes and outlets in the exact positions to meet our needs. The new alcove created by moving the door will become a vanity area, so we added boxes for wall sconces there as well as new outlets. Because we were moving the door, we also had to move the location of the wall switch. We took the opportunity to add fan switches and switches for some wall sconces we brought with us from Phoenix.

Once we finished updating the electrical, we were able to put up the drywall. We also used the drywall mud to re-texture the existing walls as we had previously done in the hall bathroom.
Then, a very exciting step- PAINT!!! We also painted the ceiling and window trim. In this photo, you can also see the odd little side window- it is filled with some sort of patterned cut glass. A '70's detail that we're definitely keeping. You can also see how excited Vaughan was to get into his new bedroom. (He's even standing in his spot in this one.) You can also catch a (night time) glimpse of the HUGE rhododendron outside the window.
Finally, we took a trip to our local Lumber Liquidators. We decided to go with the same brand of laminate flooring that we had installed in our condo in Phoenix- Dream Home Nirvana brand. This time we went for Buchanan Oak. It stood up well before, so we expect the same result here. It could even handle our drooling dog (and that's saying a lot!). Another bonus of using a product we were familiar with is that we had previously mastered the installation process- while the boxes note "Easy and Quick Assembly"- it's not quite that simple. But, once you get the feel for it, you can build a rhythm. The cuts slow you down more than the installation. We finished the master in about 4 hours. Unfortunately, they did not have all of the square footage in stock that we needed, but we were able to bring home about 670 sq. ft.- enough to get the back of the house bare-foot ready. Also- in this photo, you can see the soon-to-be vanity alcove area.

Please excuse the unmade bed in this shot- Vaughan was so excited he couldn't even wait for blankets before getting cozy in the new room.

More pictures will come of the master once we finish the vanity area- the tile has arrived and we have picked out the cabinets- more on that later too.

Sunday, June 26, 2011

2 - 1 + 1= Why did they take it out in the first place??

As I believe we have already mentioned, this house originally had 2 bathrooms. A full bathroom off the hallway, and a full bathroom off of the master. Somewhere along the line (in another moment of design genius), these two bathrooms were combined to make one single bathroom. The area off of the hallway contained a bathtub and a sink, and the area off the master was an over-sized WC.


After doing some investigating (mainly cutting holes in the drywall and floor), we discovered that all of the original plumbing was still there- just capped off. So, our next step was to close off the wall between the hall and master bathrooms. We started by framing out our new wall. This was my first wall, and first time with the big nail gun- I was very pleased with myself.
Then, we installed the drywall. Well, not actually drywall, but green-board, which is more water resistant than regular drywall, and will help to reduce the chances of ever having an issue with mold in the bathroom.
Then, we began the "mudding" process. Basically, you have to tape up all of the edges of the new drywall and slap a layer of joint compound over the seams. When it's dry, you sand it and do it all over again. When you think it's good- you "hit it again" as our friend Ryan used to say to his wife Heather when they were remodeling their home. You can also use it to change the texture of your wall (which we did as well). What we didn't think about was the humidity in Oregon. In Phoenix, this stuff would have practically dried before we got it on the wall. Here, in 85% humidity, it took an entire weekend- with Tim's 500 watt halogen lamp plugged in to create heat and the fans running.

After we finally got the mud dry and smooth, we were able to prime & paint! To go with our new smooth texture on the walls, we wanted a matte finish paint. However, you want your walls to be washable in the bathroom- so we decided to go with a flat exterior paint, which is washable. We also put a layer of Kilz primer on the subfloor- an extra layer of protection against that pesky mold. Finally, we were ready to lay the flooring. We decided to go with a vinyl peel & stick tile- it's water resistant, easy to install, and was also one of our attempts at keeping the budget in line. The most important part to remember when you're laying vinyl tile is to be sure you have a good control line before starting. Also, we decided to vary the placement of the tiles so that lines would not match up- it helped in achieving a more cohesive look.

Once we were done with the flooring, Tim was able to install the new toilet. This was relatively easy since all of the plumbing lines were already in place.

We also installed a new light fixture above the sink (no more ugly brass!). After we had it set up, we realized that it did not put out quite enough light. So, it was a quick install of two new 3" can lights in the ceiling. We should also note that we installed a new exhaust fan. Compared to the old one, which drowned out all surrounding sound in the house, this one is amazing. When the shower is running, you can't even hear the fan. Not to mention the air circulation- 90 cubic ft./minute- when it is on with the door closed, you can feel it pulling air in from the hallway. It will exhaust all of the air in the bathroom in 3 1/2 minutes. That's some serious circulation. No more steamy mirrors in this house!Along with the new light fixture, we also put in a new mirror. I was concerned about finding affordable mirrors for this house (especially since we needed 3- one for each bathroom and one for my soon-to-be vanity area in the master). Amazingly, we were able to find 3 pretty cute options at Ross of all places. The one we installed in the hall bath was only $19.99!

At this point, there are only a few minor details to go- changing out the drain in the tub (the current one is a little rusty), adding a few more pieces of trim, caulking the tub and trim and a little touch up paint. Compared to the state of the rest of the house- this room is like paradise!

First Completed Space


After living in our condo in Phoenix, one of my hopes for our new house is that we would have a dedicated laundry room. The stackable unit in the closet that we had before was less than ideal (although still a step up from the laundromat).

While this house does not actually have a laundry room, we have created a dedicated laundry space in the garage. While this may not be the most glamourous topic- I'm sure everyone can understand my excitement about having a full size washer & dryer. Also- it didn't hurt that we were able to buy the washer and dryer on a Labor Day weekend sale- let's just say we got a smokin' deal- and they are fantastic! You can bearly hear that the washer & dryer are on.

To help with laundry related storage- we were able to salvage one of the upper cabinets from the kitchen.


I applied 3 coats of Kills Sealing Primer, and we installed it- voila! A place for my detergent!

Tuesday, June 21, 2011

Techno- Jargon

Rachel has now sated your appetite for some photos, so I'm going to take some time to cover a few technical aspects of our project. Namely, I'm going to rail against the abuses perpetrated by my chosen profession during the 'boom years.' I've encountered this a few times in the past, but this house is distilling that outrage to a finer proof.

A little back story-

Back in the glory days, when housing developments were sprouting like dandelions, and the market was growing exponentially faster than the population, anybody who was a slick enough talker could find themselves a rising star in construction. I know, because that's when I learned to be a slick talker. The point is, it didn't take a lot of real expertise to make money in the field at the time. I know at least one crew who made all of their money for about 6 years doing strictly roofs in one sub-development in Missoula. Don't get me wrong, these guys were not hacks, but many others were. And they, by and large, suffered when the boom ended and they were forced to do more than just roofs. They simply didn't know their way around floors and walls, and it took a bit of learning for them to get up to speed. Others, like some of the guys I worked for, had always been doing quality work on a number of fronts, and they were able to trim sails and survive; betting, as it were, on the card to come. A great many people who had never turned in stellar work, but still made money, have found themselves out on their hind-ends. Now, as those boom houses reach the remodel market, we are finding mistakes that were made in the boom years.

The first place I realized I was in for some real hard work was perusing the home inspection report for details that I had missed. Here are the photos of the garbage disposal wiring. Lets Recap: I am not a licensed electrician. However, I don't think it is appropriate for romex to be wire nutted sticking out of the wall. Also, I am more accustomed to seeing the disposal with a cord and a half hot outlet, servicing the disposal and dishwasher. And I am certainly not accustomed to having copper wiring sticking out where a person can hook it when getting something out of a cupboard. Or where children can lick it. This screams, "Touch a metal pan to me, it would be so awesome!"

That was not the end of my electrical trials and tribulations. The next came when I was safing the house up for demolition.

Rachel touched on the photogenic aspects of demo, but I'm going to clarify a couple points. She mentioned that my style of demo is a little different from the kind you usually see on HGTV, or Extreme Makeover Home Edition. Their style is lots of sledgehammers, lots of people, lots of cameras, and general destruction. Its fun, cathartic, and looks great on video. It gets people really into it, with lots of glass shattering and drywall demolished. They also don't show people cleaning up after it gets over. It makes a MESS!

I go about things in a much more controlled fashion. Lots of sawzall, and almost no BMFH (the first word is Big, the last word is Hammer). A good day of demo for me is when I can remove drywall and studs that are almost reusable. It makes less dust and its good for salvaging materials.

Back to the story: I was getting ready to remove the various walls that surround the kitchen. This involved opening up walls to clear the drywall, identify electrical and plumbing, and opening up the ceiling to get access to the roof framing. I started flipping breakers; I have a nifty little magic wand that tells me whether a wire is live without any contact. OK, lets read the panel list. OK, that makes no sense whatsoever. Lets try THIS one. Nope, living room. OK, how about THIS one... and so on. It took me 4 breakers to kill the kitchen. When that was done, I think I had power to two rooms in the house. Not a win for circuit organization.

Almost immediately after that, I began to notice more signs that something wasn't right. Wires going the wrong direction than I thought they should, wires not being where I expected them; just general weirdness. Then I pulled the first box open. I am not, as aforementioned, a pro, but I think that there are supposed to be wire nuts in these things, not just black tape... about three quarters of the boxes in the house had crimped and taped wires. The other quarter had only one wire coming in, so they don't really count, do they? Not even very well taped, quite a few of them came apart and exposed live wiring during the initial 'poking at the box to see what the heck' phase.

So I wound up with 4 circuits running into the kitchen. Two of them were dedicated circuits for the dishwasher and disposal. Dedicated 20 amp circuits, for a 5 amp appliance and an 8 amp appliance. The dishwasher, BTW, was wired exactly the same as the disposal, with wire nuts and romex running directly to the unit. Non-sealed connections in water contact areas of the house without GFCI protection. The third was the refrigerator outlet and 3 of the 5 outlets.

The fourth was the entire back of the house.

Two baths (well, one very strange one at the time, but eventually/originally two baths) three bedrooms, the hallway lights, and the (wait for it) microwave (a remodel install, they jumped it from the back of the bathroom outlet). The breaker? 15 amps. You should see the lights dim when I fire up the shop-vac, its quite impressive... for scale, Rachel's hair dryer uses 1875 Watts (Watts=Amps*Volts), so peak draw when she turns on the hair dryer is (1875/120=) 15.625 Amps. 5/8ths of an amp more than the rated load for the breaker that runs half the house, and of course she doesn't dry her hair in the dark...


During demo, in addition to the exposed wire nuts, poor/dangerous/stupid circuit organization, I found live wires sticking out of the ceiling (I think there were originally two lights in the kitchen, and one was removed, and the wires clipped off and left to hang); I found a lot more crimped wires; and the coup de grace: A critical lighting wire hanging loose inside the wall. The other end of this piece of 12-3 is a three way switch in the dining room that I kept trying to find the companion switch to. I guess this answers THAT question.


Moving past electrical, lets take a look at plumbing. First off, we see saw this one in the inspection report: Corrosion at the water heater and at the drain valves in the crawl space. The reason? They used black pipe. Not even galvanized pipe, which itself is not code compliant anymore, but black gas piping. When I pulled the drain stubs on the plumbing in the crawlspace, I had to stick a screwdriver into the pipe to knock the rust loose before the lines would drain. There was about 8 inches of solid corrosion accumulated in the pipes. It was preparing to seriously start impacting our drinking water supply.

Also, speaking of black pipe, we return to the curiously divided bathroom. This was originally two baths, and some delving into the crawlspace revealed that the original plumbing was still intact. After opening the wall up, we found that yes, indeed, the original lines were still there. Plugged with black pipe threaded plugs. The corrosion from THAT was working its way back down the plumbing lines from the other end. Its still a mystery to me how we couldn't taste the rust in the water, or even see it, especially considering the house was sitting empty with full lines. As it was, every time I worked on the plumbing, I knocked loose another round of rust, that would work its way through all the plumbing until excised.

For drain plumbing, not too bad, as it predates all this work. They did manage to cap an ABS (black plastic) pipe with a PVC (white plastic) cap, but at least they DID cap it, so it could have been worse. Such as the improperly installed toilet which, as I noticed while on my hands and knees in the crawlspace, had been leaking probably since its install, leading to the unfortunate sewage smell that had permeated the house. A new $5 wax ring and problem solved. Forensic analysis showed that the toilet had been rested on the edge of the wax ring before install, so it had always leaked. We were fortunate it did not rot the floor, only filled the crawler up with nasty water.


Lastly, I'm going to discuss the framing. This I discovered a little later than the others, as I had to take steps to remedy all of these things as we went along. Remember the wood stove in the stupid position? Turns out the collar was not properly installed, so it was getting ready to light the house on fire. Which would have led to the roof falling in, because it turns out there was this pesky thing called a ROOF JOIST in the way when they put the stovepipe through. Turns out I'm not the only one who uses a sawzall. They did put some 2x4s under it, but the ceiling framing is not load bearing in any way, and they didn't even bother to nail the braces off. This one is still on the list to repair.

And the living room beam; I thought it seemed a bit lackluster for the span- turns out I was right, it was just a stack of 2x4s. Not continuous ones, either, just a nailed up selection of 2x4 that is supporting the ceiling in the living and dining rooms. Fortunately, the roof is true framed, and doesn't require center support, or this would be supporting the roof load.

The more we get into this project, the more I am glad we have the opportunity to jump on this remodel from the get go. There are some things going on here that were serious fire hazards (I stopped keeping track of fire hazards when I got to 7), as well as health (drain plumbing) and physical hazards (possible roof and or ceiling collapse). We are making it right as we go along, but its a long and involved process, to say the least.

On that note, I have to go crunch some numbers, so we can get the beams and the framing fixed and replaced. The road goes on forever and the story never ends...

Friday, June 17, 2011

Demolition!!!


One of the first major orders of business was removal of the kitchen. I've learned that, while the way they do it on HGTV (swinging sledgehammers, jumping through walls) is very dramatic, Tim's way of doing demo is much better. Everything comes out of the house faster, and there are very few tiny pieces to pick up- and far less drywall dust! I guess this is what working with a professional is all about!

The pictures really don't do the "sunshine-y" kitchen justice. While the color itself is not really that bad- the cabinets were so filthy and disgusting that we decided they weren't worthy of donation to Habitat.
(Of course once the cabinets were out I had to immediately shop-vac all the cobwebs & such)

(This picture is just for show- as I said earlier, we never even used the sledgehammer. Or BMFH as Tim says.) On another note- I love that my "construction" clothes involve me looking exactly like I did in high school- Doc Marten's and all. (Sans respirator of course.)
Same goes for most of the appliances. The dishwasher and microwave are currently residing on the side of our backyard (which has become an impromptu junk heap).

The refrigerator we could salvage with a little Clorox and it's set up shop in the garage (currently our only fridge- but eventually Tim's much coveted beer and meat fridge). The stovetop was OK- but I was told by both Tim and my Dad to not bother even looking inside the oven- so I haven't. Apparently it is really REALLY gross. We did end up setting the stove back up so we could at least use the cooktop and also re-set the sink so we could wash dishes and such.

All In The Golden Afternoon


What is it about finally having a yard that constantly makes me think of Alice in Wonderland?

While it was in a pretty wild state when we moved in, it is obvious that a real plant lover lived here once. I haven't really poked around in the garden since I was in high school begrudgingly helping my mom in the yard on weekends in Ohio. However, now that I have a yard of my own, I am really excited to learn about all of the plants (especially the roses!) and am doing my best to not kill stuff. The not-killing-stuff is helped immeasurably by living in a place where plants seem to enjoy life. So much different than Phoenix- where we inevitably killed anything we attempted to grow on our balcony.

A few pics of the plants we have in the backyard:


I know Tim has already posted some pictures of the 3ft. grass that we had in the front & back.. but I have to share a few more. It was really out of control. To the point that Vaughan (the pooch) made a nest in it, much like a deer in a forest meadow...

We have made some improvements so far... other than weed-whacking the grass down to a manageable height..

We cut down the juniper bush which was growing into the house- prompting ants to find a way inside- and also blocking all of the daylight from the bathroom window.

We also cut down the Virginia Creeper that was attempting to choke out every surrounding plant and also doing it's best to make a home in our siding and gutters.
And of course, I have been calling my Dad consistently for pointers on how to take care of the 10 ft. rose bushes...
And finally.. the crowning glory of the backyard... The MYSTERY TREE!!!
We have no idea what it is- and intend on stopping in a local nursery to try and figure it out. At first, we thought it was an Elm- but then one day it started budding...Now it is in full bloom- filled with bumblebees and bright pink flowers that look like snapdragons.. and a scent that smells just like the orange blossoms used to smell in Phoenix. We have tried to ask The Google- but cannot figure out what in the world it is. Whatever it may be, I love it!